 |
| It's a bit dodgy, this process. |
The ENT jumpsuit sleeves are kind of funky in their construction, as you've probably noticed.
That said, it's not really more difficult than sewing any other wedge shapes/inside angles/inside corners (which you're no doubt familiar with if you've ever made a VOY jumpsuit or jacket, or most of the DS9/NEM-era uniforms.)
|
|
The biggest difference is that the ENT jumpsuit's armscye edges are slightly rounded rather than straight.
The first step is to identify the "pivot point" of the armscye stitch line on the front body.
To do so, mark your seam line using tailor's chalk (assuming you know for sure at this point that it steams away.)
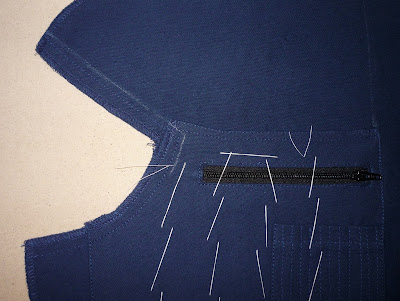
The point at which the two lines overlap is your pivot point, and on the front body, it should be exactly at the upper edge of the chest pocket.
However, given the accumulation of the layers, pressing, serging, pinning, basting, and stitching, things may have shifted slightly, or there may have been a slight cutting error, and the pivot point may not align with the upper edge of the chest pocket.
If you find this to be the case, simply shift the seam line slightly so the pivot point is correctly aligned and adjust your seam allowance accordingly when attaching the sleeve.
It really does make a major difference; you want your finished sleeve to look like this:
Not this!
Once you have correctly identified the pivot point of your stitch line, diagonally clip the seam allowance to the stay-stitching.
NOTE: On the screen-used ENT jumpsuit "Lynsioux" photographed and shared, the armscye was not clipped! However, we've found that diagonally clipping the armscye to the stay-stitching helps tremendously and makes the sleeve attachment process considerably easier!
Then identify the corresponding pivot point on your sleeves.
On our ENT jumpsuit pattern, we have included a slight amount of ease on each of the armscye edges of the front sleeves (piece D) and back sleeves (piece E) - approximately ¼" on each edge.
This gives the sleeve some additional fullness and wearing ease, which is useful and welcome since the jumpsuit's shoulders are "sculpted" to fit the wearer as well as possible!
However, it does make the sleeve attachment process a bit more involved.
(Don't worry; we hate easing sleeves, so we've made it as easy as possible, and we'll walk you through it!)
If you're a seasoned tailor/costumer, you may be able to handle ¼" ease with no problem or additional aids.
However, given how imperative it is to properly align the pivot points on the sleeve and body, we prefer to not take the risk of just easing the sleeve edges in manually.
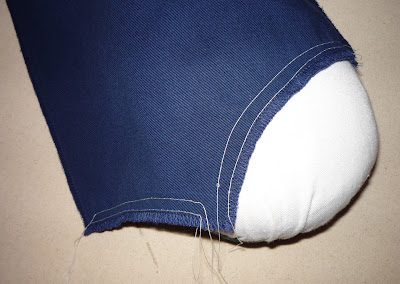
We recommend sewing two rows of gathering stitches within the seam allowance on each armscye edge of the sleeve, just as one typically would for a standard set-in sleeve.
If you're unfamiliar with the process (and you're wanting to make an ENT jumpsuit?!?), we recommend switching to a contrasting thread color, lowering your machine's thread tension, and setting your machine's stitch length to the longest option available (usually 4-5).
Sew a basting stitch ½" from each armscye edge of the sleeve, then another ¼" from each edge.
Gently (but firmly - it is denim, after all!) pull the fabric along the bobbin threads slightly to "shrink" the armscye edges by about ¼". We like to "overshoot" a bit and gather about ⅜" or even ½", since it's easier to pull it back out a little as needed than to try to ease that last extra bit in right at the end (ugh).
This will cause the fabric to contort a little bit, but don't worry!
 Drape one armscye edge of the sleeve over a tailor's ham. Heavily steam, then gently press the gathered fabric (still steaming). The armscye edge, having only minimal ease and being cotton, should eventually conform to the reduced size of the edge.
Don't press past about ¾" from the edge, though, or you'll start to actually reduce the fullness that the sleeve ease creates!
TIP: Contrary to the above photo, press the sleeve's armscye ease from the RIGHT side!
The goal is to have no puckers or folds along the armscye seam lines.
(Yes, this will make the uppermost portion of the sleeve a bit warbly, but that's supposed to happen!)
Align the pivot points on the front body (piece B) and front sleeve (piece D).
Sew the front sleeve to the body, right sides together.
TIP: With the sleeve on top, stitch to the pivot point and stop with the needle still in the fabric. Lift the presser foot and rotate the sleeve so that the sleeve's other armscye edge is flush with the other edge of the body's armscye, lower the presser foot, and continue stitching.
Once attached, the underside of the sleeve will look something like this:
Remove the rows of gathering stitches.
Notch the upper corner of the sleeve's seam allowance (the fabric you can see beneath the body's diagonally-clipped armscye) so the sleeve will lie flat at the corner.
From the wrong side, press the seam allowances toward the sleeve.
Typically one would probably not press from the right side, but we like to also press the sleeve away from the body on the right side.
Your finished sleeve should look like this:
Repeat for the other side.
Repeat for the back body (piece C) and back sleeves (piece E).
PREVIOUS: Tutorial, part 7 - Left Thigh Pocket


No comments:
Post a Comment