
As mentioned previously, it is much, much easier to install the sleeve zipper and sleeve gusset before the sleeves are closed!
Nevertheless, we're obsessive sticklers for screen-accuracy, so that's the method we're presenting to you here.
Begin by hemming the sleeve by pressing the hem allowance upward, pinning, and sewing through both layers from the wrong side.

NOTE: On our ENT jumpsuit sewing pattern, the sleeve's hem allowance is 2 ⅝". This is admittedly an unusual hem allowance, but we allocated it this way because the sleeve cuff is attached to the sleeve after the sleeve is hemmed, so there's actually ⅝" seam allowance at the bottom of the hemmed sleeve! The end result is that the sleeve's topstitched hem will be 2" above the sleeve cuff.
Position the sleeve zipper so its lower edge extends, or nearly extends to, the bottom of the sleeve.
Install the sleeve zipper in the same manner as done previously with the front zipper.

Press the 1" hem allowance of the sleeve gusset (piece S) upward on the wrong side and hem by topstitching through both layers from the wrong side.


Fold the sleeve gusset in half vertically and press.
TIP: Mark, in the manner of your choice, the seam line for the sleeve cuff (⅝" from the bottom of the sleeve).

The installation process for the sleeve gusset is basically the same as done previously with the front facing, except for the sleeve gusset should be positioned so its outer edges are ¼" inside those of the sleeve's seam allowance.
(This is because the sleeve gusset has ⅝" seam allowance, but the outer sleeve's lower seam allowance was widened to ⅞" on each to side to accommodate the sleeve zipper.)
Vertically position the sleeve gusset so its lower edge is slightly above the sleeve/sleeve cuff seam line.
Fold the two seam allowances upward and pin them together from the "wrong" side - that is, the underside of the sleeve/zipper opening seam allowances.


Position and pin the other side of the sleeve gusset in the same manner.

Using your zipper/piping foot, sew the facing to the center front as closely to the previous stitch line as possible. (This will be just shy of ⅞" from the edges.)

TIP: Although it may involve some curving, "cheating," and somewhat uneven stitching, extend the stitch line upward onto the sleeve's seam allowances above the sleeve zipper! (See next photo.)
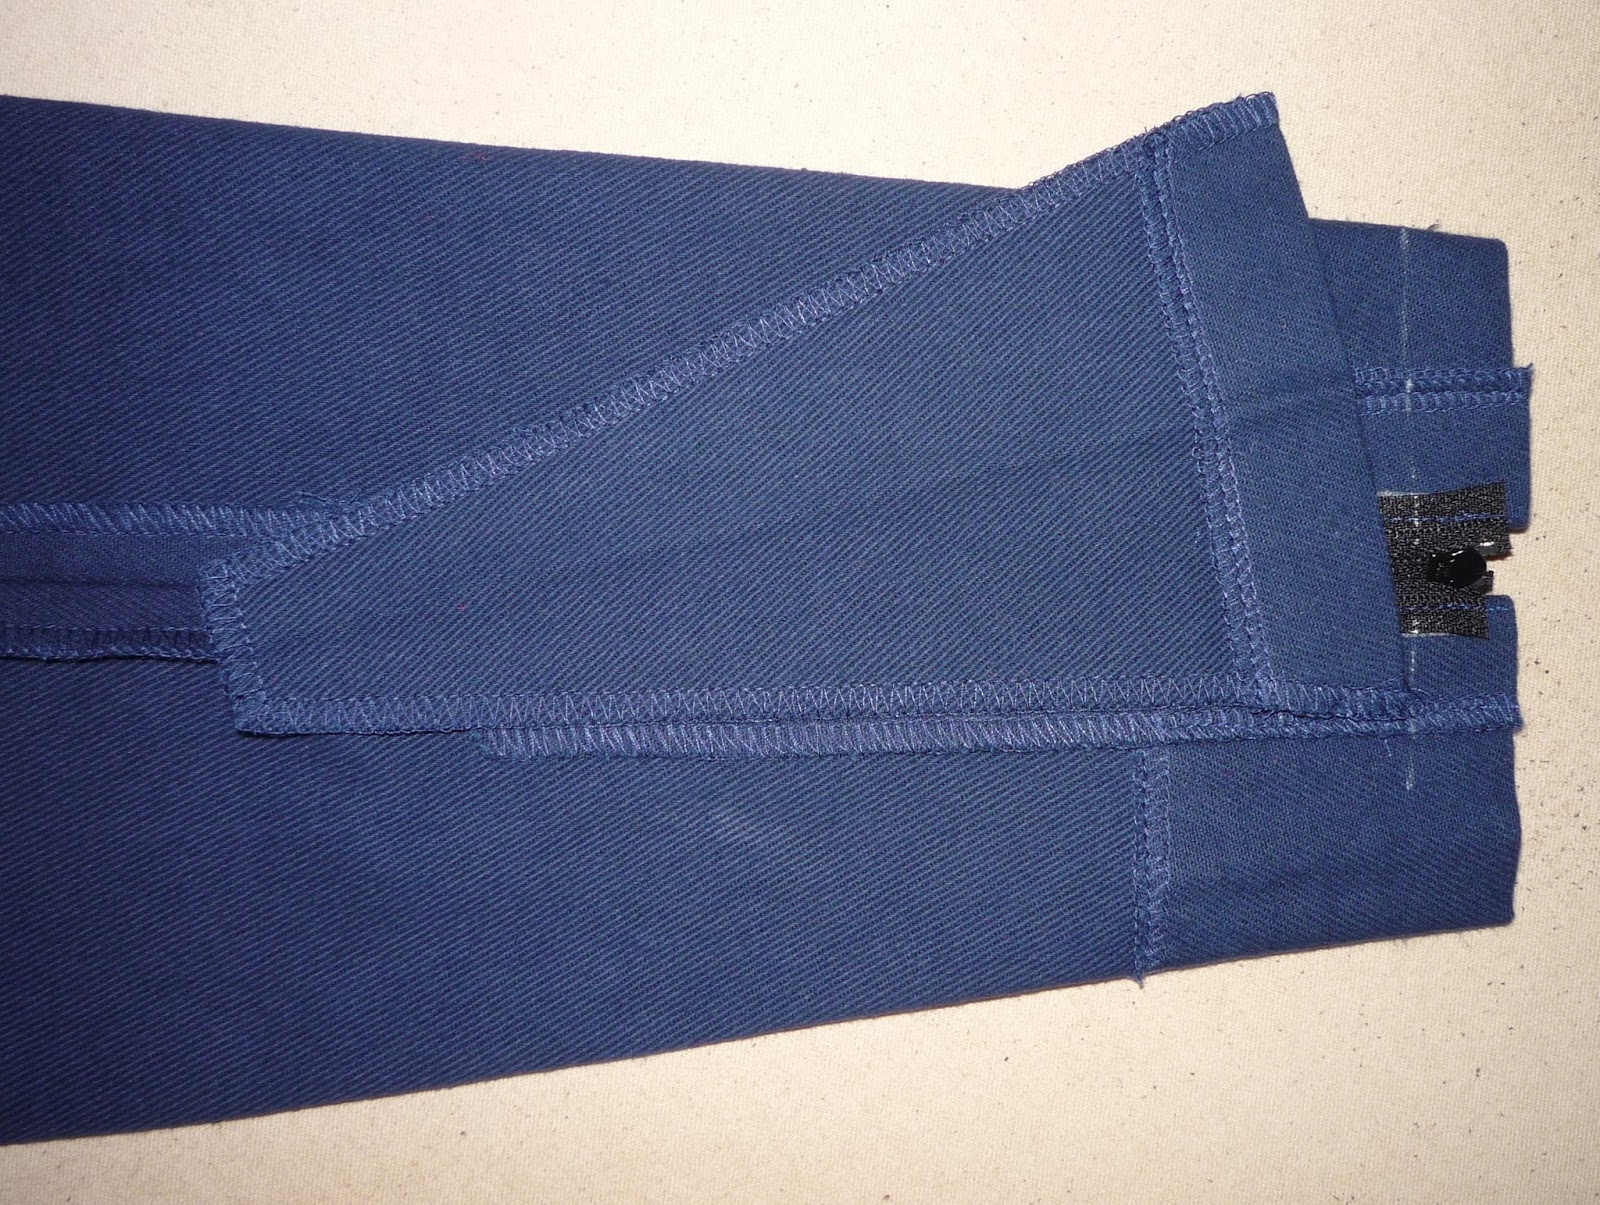
The underside of your sleeve, with the sleeve gusset attached, should now look something like this:

And your sleeve gusset should look something like this from the right side:

Topstitch through all layers ¼" from the edge of the sleeve zipper around the entirety of its perimeter, catching the sleeve gusset's seam allowance in the stitching.

Fold the sleeve cuff (piece T) in half, right sides together, so the long edges are flush. Do not press!

TIP: Mark the sleeve/sleeve cuff seam line in the manner of your choice! (See above.)
Sew the sleeve cuff closed at the sides, stitching from the folded edge to the sleeve/sleeve cuff seam line.

Trim the seam allowances at the corners.

Turn the sleeve cuff right-sides-out (poking those corners out as sharply as possible!) and press.

Press one end's seam allowance under.

TIP: Think ahead about grading the seam allowances and trim this edge's down to ⅜" before pressing under!
Pin, then sew the sleeve cuff to the bottom of the sleeve, right sides together, with the front of the sleeve cuff overlapping the back.
(Yes, the back edge of the sleeve cuff should "encompass" the end of the sleeve zipper, so the zipper gets sewn into the cuff.)

TIP: Grade the seam allowances to reduce the accumulated bulk at the bottom of the sleeve! We recommend trimming the sleeve cuff's seam allowance down to ¼" and the sleeve's seam allowance down to ⅜". Alternatively, you can leave the sleeve's seam allowance as-is and trim one end of the sleeve cuff to ⅜" before pressing it under.
Press the sleeve cuff downward, away from the sleeve.
Matching upper edges on the right and wrong sides, pin the upper edge of the sleeve cuff to the upper edge of its "self-facing" on the wrong side.

Edge-stitch the upper edge of the sleeve cuff, catching the upper edge of the "self-facing" in the stitch.
You can also edge-stitch the side edges of the cuff at this point, or save it for last.


TIP: Before continuing, press the sleeve cuff over a tailor's ham so the layers will better conform to each other and cooperate when topstitching!
Horizontally topstitch the sleeve cuff in even, parallel ¼" increments. The sleeve cuff should be the exact height for six such rows of even topstitching.
Edge-stitch the bottom of the sleeve cuff, as well as the sides (if you didn't already.)

Cut a short length of ¾" black hook-and-loop tape ("Velcro") for the sleeve cuff overlap.
Position it so it's vertically centered and extends close to the edge of the overlap.
Topstitch the hook-and-loop tape into place through all layers.

TIP: Try to work it out so the upper and lower stitch lines for the hook-and-loop tape are exactly over the previous rows of topstitching, but if not, no worries. The originals were all over the place, too. It's just a nice extra little bit of finesse.
Repeat for the other side.
PREVIOUS: Tutorial, part 17 - Close Inseam
No comments:
Post a Comment